How Ezcosplay Made the Gachiakuta Guita Hebby Fantasia Cosplay Costume — A Behind-the-Scenes Tutorial
Category: Cosplay Making | Series: Gachiakuta | Character: Guita
Want to see how a professional cosplay costume comes to life, stitch by stitch? In this behind-the-scenes tutorial, we walk through the key production steps our EZCosplay team follows to craft the iconic Guita Hebby Fantasia costume from Gachiakuta — from raw fabric on the cutting table all the way to the finished look. If you'd rather skip the DIY, grab the ready-to-wear Gachiakuta Guita Hebby Fantasia Cosplay Costume — currently on sale for $69.99.
About Guita & the Hebby Fantasia Design
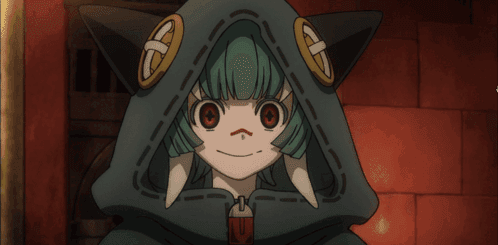
Guita is one of the most visually striking characters in Gachiakuta by Kemuri Karakara. Her Hebby Fantasia form features an oversized gray-green hooded bodysuit, a bold red oval chest panel, exaggerated bell sleeves with long white claws at each fingertip, and a branded wrist armband. The silhouette is creature-like, dramatic, and instantly recognizable on the convention floor.
Recreating it accurately demands careful material sourcing, structural 3D work, and clean tailoring — all of which we cover below.
Materials & Supplies
Before a single stitch is made, our sourcing team selects every fabric and notion. Here is the complete bill of materials used for this costume:
Fabrics
| # | Fabric Name | Color | Width | Amount per Piece |
|---|---|---|---|---|
| 1 | Space Cotton | Black | 142 cm | 0.25 m |
| 2 | Soft Polyester | #888 Green | 150 cm | 4.80 m |
| 3 | Printed Soft Woolen (supplier) | — | — | 0.30 m |
| 4 | Cotton Lining | White | 143 cm | 3.50 m |
| 5 | Polyester | 4022 Red | 150 cm | 0.65 m |
| 6 | Milk Silk | White | — | 0.12 m |
| 7 | Interfacing | — | — | 0.70 m |
Notions & Trims
| # | Item | Spec / Color | Qty |
|---|---|---|---|
| 1 | Zipper | 70 cm × 1 pc | — |
| 2 | Armband Cuff | Black | 1 set |
| 3 | 3D Printed Parts (Claws) | — | 52 pcs |
| 4 | Pearl Cotton Padding | — | 50 grams |
| 5 | Large Safety Pins | — | 1 pc |
| 6 | White Leather Strip | 56 mm wide | 0.50 m |
| 7 | Felt | White | 0.10 m |
Pro Tip: The #888 green soft woolen is the backbone of this build — you need nearly 5 meters, so always order extra to account for pattern matching and directional grain.
Step-by-Step Making Process
Step 1 — Pattern Drafting & Fabric Layout
The production begins by laying the main #888 green fabric flat on the cutting table. Pattern makers trace all bodysuit panels directly onto the fabric using tailor's chalk. Because Guita's silhouette is intentionally oversized and creature-proportioned, each pattern piece runs significantly larger than a conventional garment.
At this stage:
- Seam allowances (1–1.5 cm) are marked on all pieces
- The center-front zipper opening is plotted precisely
- The red chest oval template is prepared separately on the polyester
- Interfacing strips are mapped for the hood edge and zipper placket
Step 2 — Fabric Cutting
With all pieces chalked out, our cutter works through each layer using sharp fabric shears for clean, accurate edges.
Pieces cut at this stage:
- Front & back bodysuit panels — Soft Polyester #888 Green
- Hood & ear extensions — same main fabric, interfaced
- Red chest oval — Polyester 4022 Red
- Bell sleeves — Soft Polyester, cut on grain for natural drape
- Lining panels — Cotton Lining, mirror-matched to outer pieces
- Interfacing strips — Interfacing, for structure at hood and zipper
Step 3 — Sewing the Main Body
Assembly follows a structured order on industrial sewing machines:
- Attach the red chest oval to the front body panel. Edges are top-stitched flat for a crisp, clean finish.
- Join front and back at side seams and shoulder seams.
- Insert the zipper — a closed-end zipper, 70 cm long, is set down the center front. A clean, nearly concealed application keeps the aesthetic intact while remaining fully functional.
- Set the sleeves — bell sleeve pieces are attached to the armscye, then the sleeve seam is closed. The cuff end is left open for claw installation in a later step.
The cotton lining is built as a separate inner shell and then joined to the outer shell at the neckline, hood opening, and hem.
Step 4 — Hood Construction
Guita's hood is the most character-defining structural element. It has a wide face opening with rounded, ear-like protrusions on top.
Steps:
- Sew the two main hood panels together along the crown center seam.
- Construct and attach the ear/protrusion shapes — each is interfaced to hold its form.
- Apply the white strip (white leather strip, 56 mm wide) around the hood opening as a border — this is the pale contrast edge visible in all reference images.
- Sew the completed hood to the bodysuit neckline.
Step 5 — 3D Claw Tips (The Most Distinctive Step)
This is what makes the Guita costume unmistakable: long, tapered white claws extending from each fingertip of both sleeves.
As shown in the making vlog — “stuffing the claw tips”:
- 3D-print the claw forms — 52 individual pieces in total, accounting for all fingers plus quality-control spares.
- Fill each claw with pearl cotton padding to add slight cushioning and prevent stress cracking during wear or transport.
- Line the claw base with white felt to create a clean, stable attachment surface.
- Test placement with large safety pins before final permanent attachment to the sleeve cuffs.
This step alone is the most time-intensive in the entire build. All 52 pieces must be printed, stuffed, covered, and attached with precision — all to consistent sizing for the specific costume size being made.
Step 6 — Armband Detail
The armband is constructed from the black cuff fabric, interfaced for body, and finished with clean top-stitched edges. It carries the Gachiakuta seal detail and slides over the right wrist as a layered accessory over the sleeve.
Step 7 — Final Assembly & Quality Control
With all individual components complete:
- Hood permanently joined to bodysuit neckline
- All 3D claws affixed to both sleeve cuffs
- Armband paired and checked for fit
- Full steam press on all outer panels to remove handling creases from the soft woolen
- Costume fitted on a dress form and reviewed against character reference art for proportion, color accuracy, and silhouette correctness
Only pieces that pass this final check move on to photography and shipment.
What's Included in the Finished Costume
The completed Gachiakuta Guita Hebby Fantasia Cosplay Costume includes:
- Bodysuit — full-length hooded one-piece in #888 green soft woolen, with red chest panel, integrated bell sleeves, and 3D claw fingertip details
- Armband — structured black wrist cuff with Gachiakuta insignia
Note: This listing does not include footmuffs. The costume pairs with footwear of your choice, or footmuffs can be added separately.
Skip the Build — Shop the Finished Costume
Not everyone has access to industrial sewing equipment and a 3D printer. Our team has handled every step described above so you can focus on the performance.
→ Shop the Gachiakuta Guita Hebby Fantasia Cosplay Costume — $69.99
- Professionally sewn with full lining
- All 52 3D claw parts printed, stuffed, and installed
- Available in multiple sizes (S–XXL and custom sizing)
- Ships within 24 hours
Watch the Full Making Vlog
See the full behind-the-scenes process on our YouTube channel:
▶ Guita Cosplay Making Vlog | Watch the Costume Come to Life! — EZCosplay